Vierzigerjahre-Pulli mit Fair-Isle-Kragen

- 29.01.2012 von
- Kategorie: Stricken
- Fähigkeiten: Mäßig
- Kosten: Kostenlos
- Dauer: Mehr als ein Wochenende

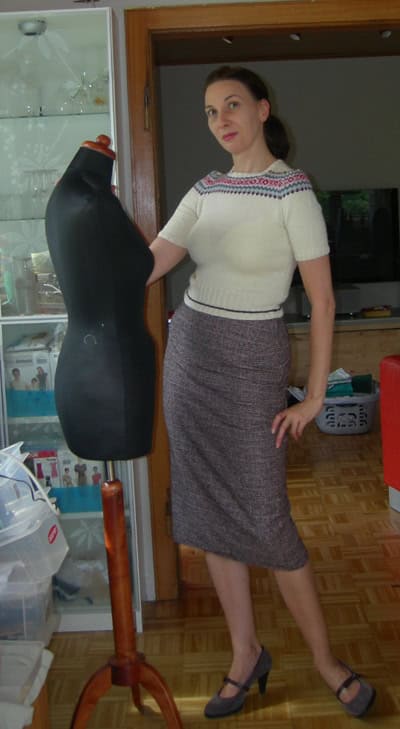
Ich stricke mit Vorliebe Pullover im Stil der Dreißiger und Vierziger, manchmal nach Anleitung, oft nach eigenem Entwurf. So wie diesen Fair-Isle-Pulli. Da ich die Anleitung ursprünglich für Freundinnen bei Ravelry aufgeschrieben habe, ist sie auf Englisch. Dafür aber kostenlos, ist doch auch schön … :-)
- Stricknadeln,
- Wolle
1A vintage inspired sweater with short sleeves and a Fair Isle yoke.

Material needed: 200 – 350 g of main colour (MC) and six other colours – all the remnants you can find. The yarn should be a 4ply and the gauge is 7 stitches = 1 inch.
2Which size to chose
If you would like to knit this with a thicker yarn knit up a sample and count your stitches. It shouldn't be too thick as you will lose the vintage look but a sport weight yarn would work, too. Let's say your gauge is 24 stitches over 4 inches and you would want to knit the size L you could simply use the explanation for size S. If you were already a small size and want to knit with a thicker yarn you will have to do some maths – but actually I would suggest to try the 4 ply because it will suit your small frame well. If you need a bigger size than those offered you could do the same: use a yarn that is a bit thicker, try a bigger needle size and use the numbers given for the size L or XL.
Be aware that this sweater is knitted with a little bit of negative ease! Don't make it too comfortable but if in doubt chose the bigger size.
3Please read through every part before starting. I will try and give some hints and tips for achieving a vintage fit and look throughout the pattern.
Your Measurements:
Bust in inches 34 36 38 40
Bust in cm 84 91 96 101
4Front:
Cast on with MC 102 (110/118/126) and work in ribbing k2 p2 for 4 rows. Change to the colour of your choice (chose one of the colours contrary to you MC) and k one row. P 2, k 2 with the same colour on wrong side. Change back to MC and k one row. P 2, k 2 until ribbing measures 3 inches.
5The end of the ribbing should hit your natural waist. This gives the sweater its forties look. If you would want to make it look more thirties keep it shorter so that the middle of the waistband sits on your waist.
First row: k / Second row: k 3, p to the last 3 stitches, k 3. This forms a little garter stitch at the side seams which is a nice vintage detail and helps you counting your rows.
6Shaping
Increase every 6th row: after the first and before the last 3 garter stitches:
k 3, m1, k to last 3 stitches, m1, k3. Increase until there are 120 (128/136/144) stitches. Continue to a point one inch under your arms. This would be something between 11 and 12 inches depending on your body shape and your height. A good way to measure this is using a fitted Tee or pullover and laying your knit over it.
7Shape armhole:
Bind off 6 (7/8/10) stitches at beginning of next two rows. Decrease 2 stitches 1 (1/2/2) time(s) at beginning of every row; then decrease 1 stitch every other row 6 (8/6/7) times until there are 92 (94/100/102) stitches on your needle. After decreasing is complete start with the Fair Isle pattern.
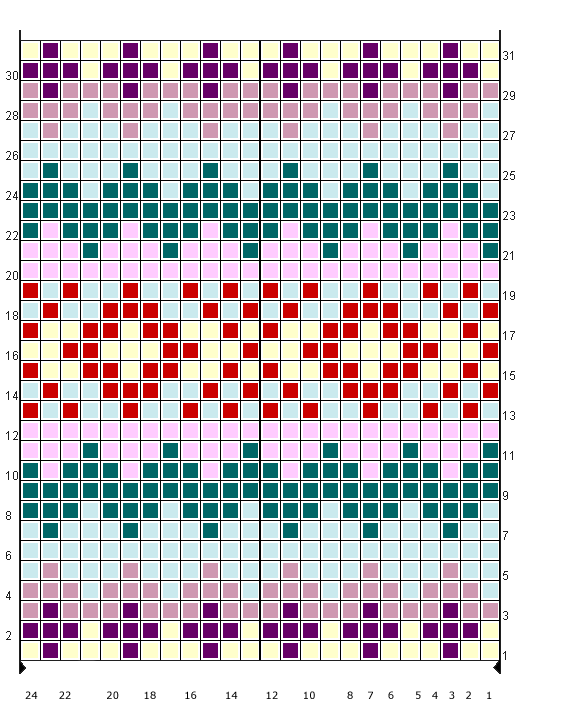
8Every size starts the pattern at a different stitch. The pattern is not completely symmetric but that won't be noticeable.
Start the pattern with stitch number 1 (2/3/4) and knit the rapport as often as necessary.
9When front measures from armhole 4.5 inches start neck shaping:
K in Pattern 26 (27/27/28) stitches, turn and p back in pattern. Continue over these stitches until front measures from armhole 7 (7/7½/8) inches.
10Shaping the shoulders:
Bind off at beginning of knit row 7 stitches 2 (3/3/4) times and 6 stitches 2 (1/1/0) times. Work right side the same except for binding off on the beginning of purl row. Put the 40 (40/46/46) stitches for the neck opening on a spare needle, do not bind them off.
Back:
This is typical vintage shaping: the front is wider than the back to provide for the bust. If you were afraid the jumper could be too tight for you or if your back needs the same amount of space as the front you could either chose the next bigger size or simply knit the back same as the front.
Cast on 94 (102/110/118) stitches and work same as front, increasing as on front up to 112 (120/128/136).
Shape armhole:
Bind off 6 (7/8/10) stitches at beginning of next two rows. Decrease 2 stitches (1/1/1/2) times; then decrease 1 st every other row until there are 92 (94/100/102) stitches on needle.
K in MC until you reach the same height for Fair Isle pattern as on front and start the pattern.
K until armhole measures 7 (7/7½/8) inches and shape shoulders same as front. On the remaining 40 (40/46/46) stitches work in 1/1 ribbing for 1 inch. Bind off.
Sleeves:
Cast on 70 (70/78/86) stitches and work ribbing for 1 inch. Work in stockinette with garter stitch border as on back and front.
Increase 1 stitch each side every 6th row 3 (5/5/7) times – 76 (80/88/100) stitches; then increase 1 stitch each side every 4th row 3 times – 82 (86/94/106) stitches.
Work even until 6 inches from lower edge.
Shape armhole:
Bind off 6 (7/8/10) stitches at beginning of next two rows. Decrease 2 stitches (1/1/1/2) times; then decrease 1 st every other row 2 (2/3/3)times until there are 62 (64/68/72) stitches on needle.
The Fair Isle pattern is – as mentioned before – not symmetrical. The pattern on the sleeves cannot match at every row with front and back because the sleeve shaping will also take stitches away from the pattern. Making the pattern go round in one smooth line would result in making sacrifices to the fit. But you are allowed to prove me wrong. If the break in the pattern is not to your liking it might look nicer to leave the sleeves without the Fair Isle part.
Start Fair Isle pattern the same row as on front and back. When sleeve measures 3¾ (3¾/4/4¼) inches above armhole decrease 1 stitch each side every other row 5 times. Bind off 2 stitches at beginning of next 4 rows; 3 stitches at beginning of next 2 rows. Bind off remaining 38 (40/44/48) stitches.
Finishing:
Sew all seams. Sew in sleeves and start at top of sleeve, pin Fair Isle part to Fair Isle part and gather the top stitches of sleeve into armhole so that the Fair Isle yoke meets at seams.
Pick up 20 (24/28/32) at neck edge from shoulder to front edge, k over the stitches on holder, pick up another 20 (24/28/32) stitches. K (every row in ribbing), turn. K 18 (22/26/30), k2tog, skp, k36 (36/42/42) stitches, k2tog, skp, k 18 (22/26/30). Repeat the decrease at corner every second row. Bind off when ribbing measures 1 inch.
11Back:
Cast on 94 (102/110/118) stitches and work same as front, increasing as on front up to 112 (120/128/136). This is typical vintage shaping: the front is wider than the back to provide for the bust. If you were afraid the jumper could be too tight for you or if your back needs the same amount of space as the front you could either chose the next bigger size or simply knit the back same as the front.
12Shape armhole:
Bind off 6 (7/8/10) stitches at beginning of next two rows. Decrease 2 stitches (1/1/1/2) times; then decrease 1 st every other row until there are 92 (94/100/102) stitches on needle. K in MC until you reach the same height for Fair Isle pattern as on front and start the pattern.
K until armhole measures 7 (7/7½/8) inches and shape shoulders same as front. On the remaining 40 (40/46/46) stitches work in 1/1 ribbing for 1 inch. Bind off.
13Sleeves:
Cast on 70 (70/78/86) stitches and work ribbing for 1 inch. Work in stockinette with garter stitch border as on back and front.
14Shaping:
Increase 1 stitch each side every 6th row 3 (5/5/7) times – 76 (80/88/100) stitches; then increase 1 stitch each side every 4th row 3 times – 82 (86/94/106) stitches.
Work even until 6 inches from lower edge.
15Shape armhole:
Bind off 6 (7/8/10) stitches at beginning of next two rows. Decrease 2 stitches (1/1/1/2) times; then decrease 1 st every other row 2 (2/3/3)times until there are 62 (64/68/72) stitches on needle.
16 The Fair Isle pattern is – as mentioned before – not symmetrical. The pattern on the sleeves cannot match at every row with front and back because the sleeve shaping will also take stitches away from the pattern. Making the pattern go round in one smooth line would result in making sacrifices to the fit. But you are allowed to prove me wrong. If the break in the pattern is not to your liking it might look nicer to leave the sleeves without the Fair Isle part.
Start Fair Isle pattern the same row as on front and back. When sleeve measures 3¾ (3¾/4/4¼) inches above armhole decrease 1 stitch each side every other row 5 times. Bind off 2 stitches at beginning of next 4 rows; 3 stitches at beginning of next 2 rows. Bind off remaining 38 (40/44/48) stitches.
17Finishing:
Sew all seams. Sew in sleeves and start at top of sleeve, pin Fair Isle part to Fair Isle part and gather the top stitches of sleeve into armhole so that the Fair Isle yoke meets at seams.
Pick up 20 (24/28/32) at neck edge from shoulder to front edge, k over the stitches on holder, pick up another 20 (24/28/32) stitches. K (every row in ribbing), turn. K 18 (22/26/30), k2tog, skp, k36 (36/42/42) stitches, k2tog, skp, k 18 (22/26/30). Repeat the decrease at corner every second row. Bind off when ribbing measures 1 inch.


Ein tolles Muster für Socken – danke!
Man muss auch keine Fäden einweben, da es nicht mehr als drei Maschen einer Farbe sind.
Ok, das ist seltsam, denn auf meiner Editierseite ist die Anleitung mit Absätzen und allem versehen …
Der Pulli ist Klasse!
Schade, wäre schön gewesen, wenn du dir die Mühe gemacht hättest und sie wesentlich mit Absätzen versehen hättest. Naja, fummel ich mich mal durch. Vielleicht bekomme ich sie ja auch bei Zeiten auf Deutsch übersetzt :-)
trotzdem; der Pulli ist schön!
Sorry, aber das ist noch ein Fehler im Publishing-System. Das heut die Absätze immer noch raus :(
Wir sind dran!!!